◆SKMEI 1418 Watch Instruction

(SKMEI 1418 Barometer watch button)
A. Button & Function Overview
- Button A: Backlight/reset/delete record;
- Button B: Function mode/long press to enter setting mode;
- Button C: Altitude measurement/decreasing;
- Button D: Digital compass;
- Button E: Barometric pressure measurement;
- Hour,Minute,Second,Month,Date and Week display(Scope of Year from 2000 to 2009);
- Dual time display;
- Double alarms;
- Stopwatch, 99 times stopwatch record, measuring capacity: 23:59:59;
- Countdown, measuring capacity: 99:59:59;
- Digital compass;
- Pedometer mode, maximum data for 7 days.
- Pacer/Metronome;
- 12/24 hour display;
- LCD contrast setting;
- EL backlight(3s/time).
B. Function Display

1.In any mode, press Button A to turn on EL backlight for 3s;
press Button B for 2s to enter its setting mode.
2.Normal Time Display
- Press Button B for 2 seconds to enter time setting mode after 'di', you can see the Second is flashing. It will exit this mode and retain the setting if no operation within 1 minute.
- Press Button B(flashing) to choose the setting according to below order:

- Press Button E to increase setting number orderly, press Button E for 2s to increase setting number rapidly;
- Press Button C to decrease setting number orderly, press Button E for 2s to decrease setting number rapidly;
- Press Button E or C to reset Second;
- When setting LCD contrast,press Button E to increase setting item orderly,long press for 2s increases rapidly; press Button C to decrease setting item orderly,long press for 2s decreases rapidly. Contrast setting scope: 1~10.
- Press Button B for 3 seconds to exit time setting mode.
3. Dual Time
- In this mode,press Button B till the Minute flashed, press Button E to increase setting data orderly; press Button C to decrease setting data orderly.
- Press Button B again till flashing of Hour pointer,press Button E to increase setting data orderly;press Button C to decrease setting data orderly.
- It will back to dual time display if no operation within 3s.
4. Pedometer
- Press Button E to view alternately: step number->calorie->distance->sport time->step number;
- In pedometer mode, it will be out of operation to press Button C shortly; but you can start/stop the pedometer with 2 seconds’ press;
- Long press Button B for 2s to enter setting mode: unit(KM/INCH)-weight-footstep.
5. History Query
- If there is no history data exist, press Button C or D is out of operation;
- This watch can record 7 days’ sport data at most;
- In this mode,the watch will flip over automatically when there is record history exist.
6. Alarm Setting
- Start/stop Time-up Alarm: In alarm mode,press Button E to switch to its setting,12H on screen displays ‘CHIME’. By this time,press Button C to turn on/off the time-up alarm(ON/OFF). After opening of time-up alarm, the normal time mode has a "CHIME" symbol is displayed, otherwise there is no display.
- Turn on/off Alarm: In alarm mode,press Button C to start/stop the alarm. Symbol of ‘
 ’ displays on screen means start, otherwise there is no symbol ‘’ displayed. Press Button E to switch setting mode of next alarm.
 - When setting the first alarm ‘AL’, press Button B for 3s with ‘Hour’ flashing,press B shortly to switch ‘Hour’ ‘Minute’ orderly.
- Press Button E to increase setting data orderly,long press to increase rapidly.
- Press Button C to decrease setting data orderly,long press to decrease rapidly.
- When the alarm reaches the setting time,it will ring for 20 seconds with symbol ‘’ flashing.
- Press any button to pause the ringing alarm.
- Press Button B for 3s to confirm then exit setting mode.
- Press Button E,setting data increased orderly,long press to increase rapidly.
- Press Button C,setting data decreased orderly,long press to decrease rapidly.
- Press Button A to exit setting mode.
- Note:The same setting method for 2nd to 5th alarm(ALM1~ALM2).
7. Stopwatch
- Measuring capacity: 23:59:59. Press Button C,the stopwatch will return to zero when it reaches maximum timing data.
- In Stopwatch mode,press Button E to start/stop timing,press Button C to return to zero when it is paused.
- Press Button C to get 01~99 groups of LAP when the stopwatch is operating.
- LAP query record range: 01~99 groups
- In LAP status,press Button A for 2s to enter LAP query status. It will be invalid if not take LAP before query.
- Press Button E search LAP up,long press to search up rapidly.
- Press Button C search LAP down,long press to search down rapidly.
- Press Button A or B to exit Stopwatch LAP mode.
8. Countdown
- Measuring capacity: 99:59:59;
- It will ring for 30s when the countdown time is 0:00:00;
- This watch has a cycle countdown,turn on the cycle countdown switch,the data will be returned to the original data at the end of cycle countdown; if the cycle countdown is turned off,it will back to normal timing.
- Setting of Countdown
- Press Button B for 3s to enter the setting in Countdown mode.
- Press Button B to switch the setting order:
- Press Button E, the setting data will be increased orderly, press Button E to increase rapidly.
- Press Button C, the setting data will be decreased orderly,press Button C to decrease rapidly.
- Press Button B for 3s,confirm then exit the setting.
- Usage of Countdown
- Press Button E to start.
- Press Button E to pause,then press Button E to continue Countdown.
- If you want to terminate the countdown mode completely, press Button E to pause then press Button C, the countdown will be returned to original setting data.
- The countdown will continue working if you exit only the countdown mode but the countdown timer.
9.Pacer/Metronome
- This function can record your sport frequency, the sound of buzzer stands for the frequency of your steps.
- Press Button E then long-press on Button C to reset.
10.Measurement of Barometer, Temperature & Weather forecast
- Press Button E to enter Barometer mode ‘BARO’ directly under normal time display or measurement mode;
- Press Button E for 3s in the mode of Barometer, Temperature and Weather forecast Measurement, Temperature and Barometer units display as below:

- In this mode, press Button B for 3s to enter Barometer and temperature manual calibration mode. The calibration items show as below:
- ‘AIRP’ ‘TEMP’ ‘F.DEF’;
- In temperature calibration mode,press Button E/C to switch ‘+’/‘-’.
- Press Button B with setting data flashing,press Button E to increase setting data,long press to increase rapidly.
- In temperature calibration mode,press Button B,the setting item flashes,press Button C to decrease setting item orderly,long press to decrease rapidly.
- Factory Default Pressure Setting:
- In the model of Factory Default Pressure Setting, press Button E(‘YES’) to choose factory default pressure data; press Button C(‘NO’) not to choose factory default pressure data.
- Input Present Pressure Data:
- In the mode of Input Present Pressure Data,
press Button E or C to enter calibration mode;
press Button B to switch setting mode;
press Button E to increase calibration data orderly, keep pressing for 2s to increase rapidly;
press Button C to decrease calibration data orderly, keep pressing for 2s,it’ll be decreased rapidly;
press Button B for 3s to confirm correct data and back to standard measurement mode.
11.Compass Measurement
- In normal timing and measurement mode,press Button D to start compass measurement mode(COMP). No operations within 1 minute,the compass will turn to under test mode;
- In compass calibration mode,press Button B for 3 seconds to enter calibration selecting mode,operation methods as below:
Manual Digital Calibration
- In this mode,press Button E/C to set direction ‘W’/‘E’ accordingly, after direction confirmed,press Button B to choose angle data orderly;press Button E/C to increase/decrease number accordingly.
- Maximum angle correction scope: ±90° (‘W’ ‘E’±45°).
- Press Button B for 3 seconds to confirm the correct data and back to compass measurement mode.
For example: If the direction of watch compass is wrong, you may use other tools to measure the north. Align number 12 with the north then press Button D to test the compass. The 3 o'clock arrow refers to the westward direction 5 °,select "E" in the east direction by the above operation method and input 5 °. Press Button A to confirm and re-measure the compass, then 3 o'clock arrow will point to the north, the digital correction is completed. If no other tools are found, please use the "CAL" auto calibration mode below, but be sure it is ‘00’ for "W" or "E" in the "DEC" digital calibration mode.
Auto Calibration
- Press Button B or C then rotate the watch slowly(either clockwise or counterclockwise) under Auto Correction Mode; Rotate in the same direction to display compass orientation data and return to compass measurement mode, the compass can be automatically corrected. Note: Replace the battery on the first time you use the compass, the watch will indicate the compass needs to be corrected, please turn the watch according to above methods to correct the compass)
- Meaning of abbreviation in each direction as follows:

- If the result of the calibration shows "ERROR", indicates that the environment you are measuring has a strong magnetic interference or the compass is out of order,leave the place and correct the compass then it will back to work.
12.The Measurement Mode of Temperature and Height
- In Temperature and Height Measurement Mode,press C key for 2 seconds to switch high temperature and height units as below.

- In Time or Measurement Mode, press C key to enter High temperature measurement(ALTI) , which display of "ALTI" state for 2s to enter the measurement mode of Temperature and Height .
- In Temperature and Height measurement mode,this watch doesn’t exit automatically if you do not control.
- In Temperature and Height measurement mode, press B key for 3 seconds to enter temperature and height correction, press B key to select settings:
- In the process of setup,press B key to switch.
Temp-correcting Mode
- In this mode, press E or C key to switch the temperature"+"-".
- In this mode,press B key, the setting item flashes, press E key to adjust the setting item plus 1; long press to increase rapidly.
- In this mode,press B key, the setting item flashes, press C key to adjust the setting item minus 1; long press to decrease rapidly.
- In this mode,press A key to confirm the correct value and back to the normal measurement mode.
Relative Height Setting
- In Relative Height Setting (ZERO) mode, switch "YES""NO" by E or C keys to choose or do not choose the relative height value as "0".
- In this mode,press A key to confirm the correct value and back to the normal measurement mode.
The Height Inputting
- In this mode(ALTI), press E or C key to switch the height "+"-".
- Press B key to select the setting item flashes;
- Press E key to adjust the value plus 1, long press to increase rapidly.
- Press C key to adjust the value minus 1, long press to decrease rapidly.
- In this mode,press A key to confirm the correct value and back to the normal measurement mode.
Sea level pressure inputting model (Height above sea level )
- Under Inputting the Sea level pressure state (SEAP),press E or C key to enter,input the value,press B key to switch the setting item flashes.
- Press E key to adjust the value plus 1, long press to increase rapidly.
- Press C key to adjust the value minus 1,long press to decrease rapidly.
- In this mode,press A key to confirm the correct value and back to the normal measurement mode.
Factory default height mode
- In the factory default state, switching "yes""no" by E or C key that means selecting or not selecting the factory's default height;it is the height value obtained from the conversion of the default sea level pressure value to 1013.25mb, according to the default sea level pressure value.
B. Description
- Enter Compass measurement mode, stop measurement after 30 seconds, exit after 30 seconds and return to Time mode.
- Enter Barometric, Temperature and Weather Prediction mode, measure data once a second, exit and return to Time mode without keystroke for 1 minute.
- Enter Height and Temperature measurement mode within 3 minutes, measure data every 5 seconds , measure data every 2 minutes after 3 minutes, and don’t exit this mode.
- In Correction mode, when you press B key to exit,if display"error"that indicate the correction error; display"done" that indicate the correction is correct.
- In the setting state, the setting item flashes with 1HZ and exit to Setting state without keystroke for 1 minute.
- When air pressure or height test is higher than test range, it shows HI,lower than test range,it shows Lo.
- The method of weather forecast detection as follows: weather condition is judged every hour (based on the change of atmospheric pressure in the first four hours). If the pressure value is rising gradually, the weather is improving, and if the pressure value is decreasing gradually, the weather is getting worse. Weather conditions are divided into 4 (from good to bad): sunny, cloudy, cloudy, rainy days.
- The range of atmospheric pressure test is 300~1100mbar or 8.84~32.44inHg
- The range of temperature test is -10~60℃ or 14~140℉
- The range of height test is -700~9000m or -2300~29529F
Instructions for using digital compass
- This watch is equipped with a magnetic directional sensor to detect geomagnetism.It means that the north as shown in this watch is the magnetic arctic, which is slightly different from the true arctic.The magnetic arctic lies in the north of Canada and the magnetic pole in the south of Australia.Please note that with all magnetic compass measurements, the closer the magnetic poles to the Earth, the greater the difference between the magnetic North Pole and the true Arctic.Furthermore,It is also important to note that some maps are represented as true arctic (not magnetic arctic), so appropriate adjustments should be made in the use of such maps and watches.
Location measurement
- When measure direction near a strong magnetic field, a huge error will be created. Thus the following objects shall be avoided when measuring direction:Permanent magnets (magnetic necklaces, etc., metal blocks (iron doors, metal lockers, etc.), high voltage wires, antennas, home appliances (TV, PC, washing machines, refrigerators, etc.)
- When in the train, ship or plane, etc. the direction value can not be measured correctly.
- The direction values cannot be correctly measured indoors, especially in buildings with many metals. This is because the metal structures in such buildings absorb magnetic force from electrical appliances, etc.
Preservation
- If this watch is magnetized, the accuracy of the orientation sensor will be reduced.
- Therefore,this watch shall be kept in the vicinity of the magnet and any object which emits a strong magnetic force, including:Permanent magnets (magnetic necklaces, etc.) and home appliances (TV, PC, washing machines, refrigerators, etc.)
- If you suspect that the watch may be magnetized, please calibrate the alignment of the directional Sensor Digital and Manual Corrections.
The reason why the direction measured is incorrect
- If the direction is incorrect, please conduct direction correction. If measure direction near strong magnetic field, such as home electrical appliance, large iron bridge, steel pillar, overhead cable, etc. or measured the direction in a train or ship, it will result in error. Please move away from the large metal object and measure the direction once again. Please note that the digital compass can not be used in train or ship.
Why different results will be produced when measure direction in a same place?
- The magnetic force from high voltage cable nearby give interference to the geomagnetic detection by this watch. Please move away from high voltage cable and do detection once again.
Why problem occurs when measure direction indoor?
- TV set, personnel computer, speaker or other objects will interfere in the geomagnetic detection by this watch. Please keep away from interferential objects or do detection outdoor. It will be more difficult when do direction detection within a building made of reinforced concrete. Please note that the direction
The working principle of altimeter:
- As the height increases, the pressure and temperature usually decrease.Height measurements of this watch is based on International Standard Atmospheric Pressure (ISA) values developed by the International Civil Aviation Organization (ICAO), which define the relationship between altitude, pressure and temperature.
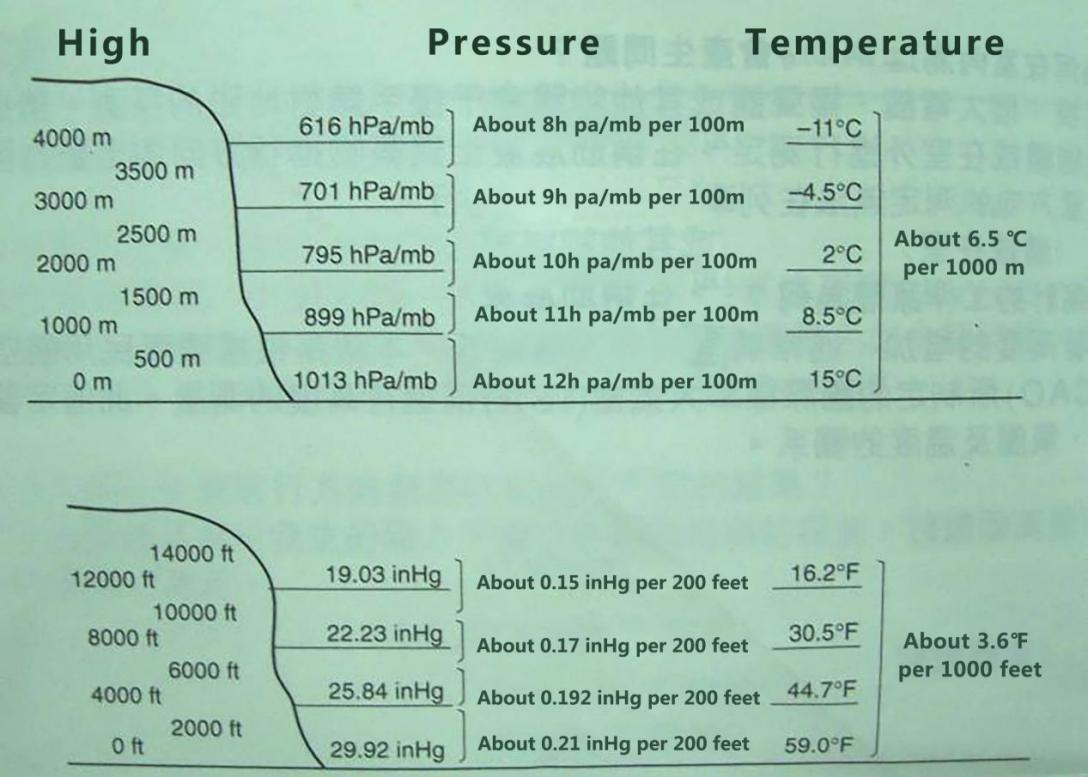
Sources:International Civil Aviation Organization (ICAO)
Pay attention to the accuracy of any situation as below, measurements will be affected:
- When the Pressure changes as a result of a change in the weather, when the temperature is extremely variable,When this watch is strongly impacted.
- There are four ways of expressing height: 1, Relative height; 2,Height where is located; 3, Altitude; 4, Default height of the factory.
- The following illustration shows the relative height and altitude. Absolute height refers to the altitude; the relative height is the difference between two different positions.

Precautions on the simultaneous measurement of height and temperature:
- Although height and temperature can be measured simultaneously, note that the best results are determined under different conditions.When measuring the temperature, it is best to remove the watch from the wrist to reduce the effect of body temperature on the measurement,but when measuring the height,it is best to wear the watch on the wrist , because it can keep the temperature of the watch stable and improve the precision of height measurement.
Below is the measure of height or temperature you need to take steps first :
- When height determination is prioritized, the user who wear the watch on the wrist or place it in other places where the temperature of the watch is stable.
- The watch should be removed from the wrist and suspended from the bag or where it is not directly exposed to the sun when temperature measurement is prioritized. Pay attention to remove the watch from the wrist when measuring pressure value of the sensor will be affected by the short.The air pressure sensor in this watch can be used to determine the change of air pressure for your personal forecasting weather.The sensor is not a precision device that can be used for formal weather prediction or reporting.
- Sudden changes in temperature can affect the measurement results of the sensor.
- The temperature will be measured by the body temperature (when you wear a watch), direct sunlight and humidity,in order to make the measurement of the temperature more accurate,please remove the watch from the wrist and place it in a place free of direct sunlight and Well-ventilation Place and dry the case, which takes about 20 to 30 minutes to reach the actual ambient temperature.
The Working principle of barometer:
- Atmospheric pressure responses to changes in the weather, which can be predicted within reasonable accuracy by observing changes in the weather, as a rise in atmospheric pressure indicates a good weather, while a drop in atmospheric pressure indicates a worsening of the weather.
- The atmospheric pressure published in the newspaper and reported in the television weather forecast is modified to be a measured value at sea level (0 m above sea level).
Important tips:quality standard
- The first time you use the compass function after each battery change, you must rotate the watch (left or right) two times, and use it to automatically correct the compass of digital gongs,and the air pressure, height, temperature will automatically use factory defaults, if there is no high precision barometer, thermometer, compass gong and other instruments as a calibration reference, please do not arbitrarily carry out the relevant digital correction!
- Air pressure or height has been adjusted due to operation error during use, please confirm the default value of the factory according to the instructions.
- The weather forecast is automatically detected every hour for 2s.
- Use a digital compass for 1 minute, the sensor works for the first 30 seconds,but will be turned off after 30 seconds.
- Use a barometric test for 1 minute and check every 5 seconds for 2s.
- Use the height test to start measuring every 5 seconds within 3 minutes for 2s, and test every 2 minutes after 3 minutes for 2s.